

11 Aug Rejuvenating Hardwood & Softwood Floors
RENOVATING WOODEN FLOORS
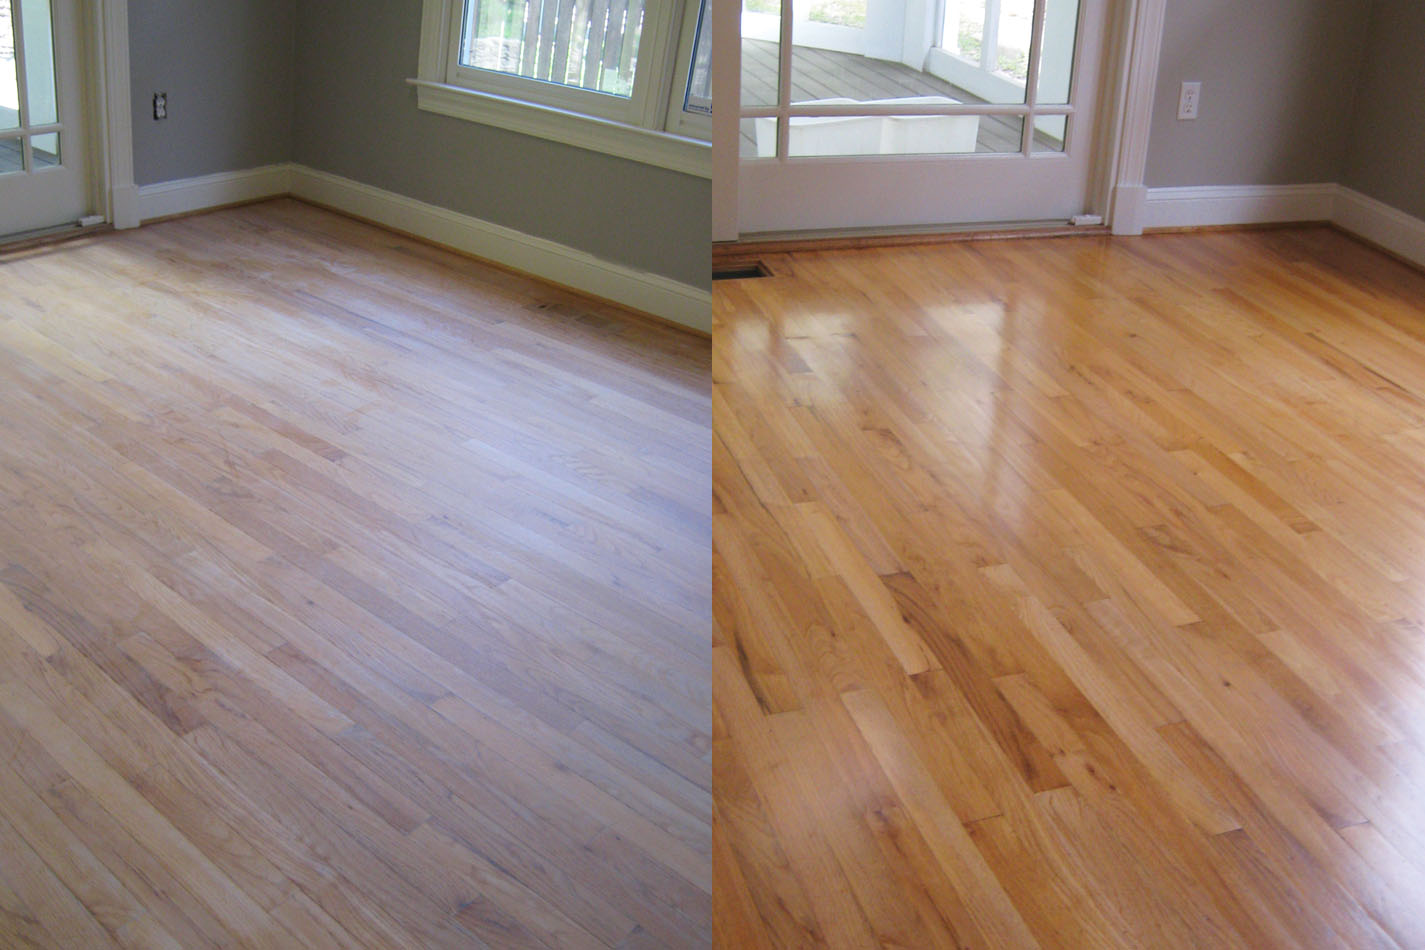
A natural timber floor can look beautiful if it’s sanded, sealed and polished and it’s cheaper than laying new carpet.
Timber floors which have been covered with carpet or lino for years, or have varnish or paint which is wearing thin, can be renovated and given a long lasting protective finish. First identify the type of floor you have.
Softwood floorboards: You may have plain, softwood floorboards – either square-edged or tongued-and-grooved planks up to 25mm thick and 150 to 230mm wide, nailed to the floor joists.
Hardwood flooring: Another type is a decorative hardwood floor. Jarrah, Oak, Mahogany and Teak are the most commonly-found woods, although other more exotic types are also used, but rare.
There are several kinds of hardwood floor. The first consists of slim hardwood planks that are either nailed to the floorboards beneath or are held in place by a system of metal clips. Cheaper versions use veneered ply wood strips instead of solid timber.
The second type is hardwood block flooring, often referred to as parquetry. This consists of small blocks of wood up to 230mm long and 75mm wide which are usually laid in a herringbone or basket-weave pattern. Older or more expensive types are blocks up to 25mm thick, bedded in a bitumen adhesive. Cheaper imitations are again veneered.
The third type is the mosaic panel – a floor tile made up by gluing small fingers of wood on a backing sheet to make up a panel 300 or 450mm square. These are laid like any floor tile, either on an adhesive bed or loose on top of a special underlay.
Deciding on the treatment the usual treatment involves sanding the floor with a powered sanding machine to remove the old finish and expose clean, fresh wood ready for sealing and polishing. Any solid wood floor can easily tolerate this, but if the surface is only a veneer then power sanding with a coarse abrasive could go right through it. In this case, gentler methods such as a hand-held belt or orbital sander are advisable.
BEFORE YOU START
Check the floor structure for signs of woodworm or rot. If you find wood worm, tackle it by lifting the floorboards and spraying water-based woodworm fluid over the affected surfaces before re-laying the boards. If you find rot, call in an expert to assess the problem; DIY treatment is often possible, but may not be effective if dry rot is present.
If the floorboards need lifting during preparation you could put in under-floor insulation. This can be done by stapling plastic netting between the joists to support fibre glass (bats) insulation, or by resting strips of rigid polystyrene insulation on nails driven into the sides of the joists. With suspended timber ground floors, make sure that air bricks are clear, so the under-floor void is well ventilated, or rot can get a hold.
TOOLS AND EQUIPMENT
The only specialist tools you’ll need for this job are two powered sanding machines, which you can hire. The larger machine is called a drum or floor sander; It resembles a cylinder lawn mower and drives belts of abrasive round a large drum. It has a built-in sawdust extraction unit. The smaller machine is needed for sanding the parts the larger one cannot reach; you may be offered a belt or a disc type. The former Is better because it will not leave scratch marks across the grain.
When you take delivery of the machines, make sure that you are shown exactly how to operate them, and get plenty of abrasive sheets and belts in coarse, medium and fine grades. Buy or hire a face mask at the same time, so you don’t choke on the sawdust. Safety goggles and ear muffs are also a good idea, though not essential.
SAFE SANDING
When using a floor sander, always wear a face mask so you don’t inhale the clouds of fine dust which always seem to escape the machine’s dust bag. Wear goggles and ear muffs.
Common sense hints:
1. Seal the door with masking tape to keep dust out of the rest of the house, and open windows for ventilation.
2. Don’t wear loose clothing; close fitting overalls are best. Protect your hands with gloves when handling the abrasive sheets and belts. Always unplug the machine when changing them.
3. Keep the sander’s electric cord out of harm’s way by draping it over your shoulder.
4. Never start the machine with the drum in contact with the floor, or it will snatch away from you uncontrollably. Stop it immediately if the abrasive tears, or you may jam the drum.
5. Lastly, don’t let children touch the machines under any circumstances.
Next Prepare Softwood Floors
Getting a good surface: – With softwood floors, using a nail punch and hammer, check that all nail heads are punched at least 3mm below the surface. Remove any tacks which have been used to hold down any previous flooring. Fix any loose boards by driving in shorter flooring nails close to existing nail positions, to minimise the risk of piercing hidden pipes or electric cables. Use deeply-countersunk screws if warped boards keep pulling the nails up.
Filling large gaps: – If there are substantial gaps between boards, fix them with slim strips of timber planed to width, glued and hammered into place. Gaps everywhere suggest that it would be far quicker to lift all the boards, to re-lay them so they butt together tightly, and to add one or two new boards as necessary to make up the gap when all the old boards have been replaced. Check the measurements of your floorboards before buying new ones: there is a range of standard sizes, but if you have old or unusual boards, you may need to order planks cut to size.
Replacing rotten boards: – If you find boards that are split or otherwise badly damaged, replace them with new boards. To lift tongued-and grooved boards, first cut through the tongues along each edge with a pad saw (a long slim saw which looks rather like a knife) or a powered jigsaw. Beware of electric cables and pipes running under the boards. Then nudge the board up from one end with a crowbar or similar lever, using a scrap of timber to protect the end of the adjacent sound board. Cut the new board to fit and nail it in place. If it’s not as thick as the others, add cardboard packing under it.
Turning the boards: – If the surface is badly damaged, for example through repeated layers of linoleum being tacked down or badly stained, you can try turning over the floorboards. The undersides will be marked where they cross the joists, but apart from that they should be in a better condition (woodworm and rot permitting) than the top surface. Lift just one or two boards first to check their condition.
Cleaning up: – Finally, sweep the floor. Then make sure you’ve got all your tools and equipment with you, close the door to the rest of the house and seal round it with masking tape to stop dust from spreading everywhere. Open the room windows for ventilation, and to help the dust clear as you work.
PREPARING HARDWOOD FLOORS
With hardwood floors, check for loose blocks or panels, and stick down any that you find with flooring adhesive. Hardwood flooring is often secret nailed in place, particularly the narrow plank types and some of the mosaics. If sections have worked loose they should be re-fixed in the same way, by secret nailing through the tongue into the floor joist. Watch out for pipes and electrical installations.
NOW WERE READY FOR SANDING THE FLOORBOARDS
Starting to sand: – Fit a coarse abrasive sheet to the sander, plug in and switch on to test that it’s working. Then start sanding with the machine in one corner of the room. The arm is to work diagonally to begin with, to ensure that all the boards are sanded level with one another, so start by heading for the opposite corner of the room. Then turn around and run back over the same strip. Continue sanding the whole floor diagonally in this way, taking care not to damage skirting’s as you reach the end of each run. Replace abrasive sheets as they become worn.
Getting a good finish: – Next, change to medium-grade abrasive and sand the floor parallel with the board direction, again going over each strip in both directions. Work as close to the skirting boards as you can without scoring them with the side of the machine. Then switch to fine abrasive and repeat the whole process again. Empty the dust bag regularly into heavy-duty plastic refuse sacks. It’s also a good idea to vacuum the floor from time to time to cut down on the amount of fine dust flying around. Also change the filter in your face mask regularly so it doesn’t get clogged up.
Down to details: – You can now tackle the edges, and any other parts that the drum sander couldn’t reach, using the belt or orbital sander. Work through coarse, medium and fine grades of abrasive paper. Finish off by hand sanding any bits that have been missed.
Cleaning up: – When you’ve finished sanding, sweep and vacuum-clean thoroughly to remove as much dust as possible. Pay attention to joints between the boards, and to the corners. Then use a clean cloth soaked in white spirit – to wipe over the boards.
Try a different type of finish on your new floor: –
If you don’t like the yellowing effect of varnish, experiment with one of these techniques.
Bleach the wood first with a proprietary wood bleach or a mixture of oxalic acid and methylated spirit. Alternatively, prime the boards with a 50/50 solution of white emulsion paint and water, rubbing it into the grain.
Any water-based solution will raise the grain slightly, so apply this before the final sanding. You can also add 10 per cent white eggshell paint to 90 per cent varnish.
SANDING HARDWOOD FLOORS
A floor of hardwood timber planks does not usually require quite such drastic treatment as a softwood floor. You should find that simply sanding up and down the planks with first medium and then fine abrasive is sufficient to remove the existing finish and any slight irregularities. Don’t forget to check that the floor is not veneered – you may have to lift a splinter of wood from a corner of the room with a penknife.
A hardwood mosaic (block) floor should also be easy to tackle. The main problem is deciding in which direction to sand the floor. You should avoid sanding across the grain of the wood. So, a herringbone pattern should be sanded up and down the room, while a basket-weave pattern should be sanded diagonally. You will then have sanded the grain of the wood diagonally (as close as you can get to sanding with the grain, which gives the best finish). Depending on the condition of the floor, only medium and fine abrasives should be necessary.
Any hardwood mosaic borders round the edge of the room should be sanded with a belt or orbital sander.
SEALING THE FLOORS
Filling holes: – Now with clean, freshly sanded wood exposed, it is time to fill nail and screw holes, plus any other gaps between the floorboards which have not been filled with wood strips. Use wood filler, adding wood dye to the filler if necessary to match the shade of the wood more accurately. Use wood bleach on any deep stains that have not been removed by the sanding. When the filler is hard, sand down locally and wipe up dust with a rag using white spirits as before.
Adding colour: – You can change the colour of the floor if you wish by using wood dyes. Follow the manufacturer’s instructions carefully; in most cases a single coat of dye is wiped on to the floor with a lint-free cloth, working along the grain.
Test the effect of the dye on an off-cut first, then working over a larger area to develop the application technique. The porosity of wood varies, so test the dye on new wood to see that it matches. Also check the finished effect by varnishing the test pieces. After you have done the whole floor, wipe with a clean dry cloth to remove surplus dye.
Apply varnish: – Thin the first coat of varnish with about 10 per cent white spirits, when used on softwood, use it straight from the tin on hardwood. If the wood is porous, it may be quicker to wipe the first coat on with a cloth, rather than using a brush. Allow it to dry for as long as the manufacturer recommends; then sand the surface lightly with fine abrasive on a sanding block, and wipe over with a rag to remove the dust. Apply two further coats using a 75mrn brush, cutting in at the edges with a smaller one. Sand as before. Always work back towards the door so you can get out easily.
Using coloured varnish: – You can also apply coloured varnishes. For an even finish, it is best to prime the boards with clear varnish first, as above, before building up two or three coats of coloured varnish. A final protective coat of clear varnish can be added for extra protection.
Polishing it up: – Finish the job by polishing the floor surface – either by hand or using a hired floor polisher. Make sure that any rugs or carpets laid over the floor have non-slip pads on their undersides.